Buss up shut roti
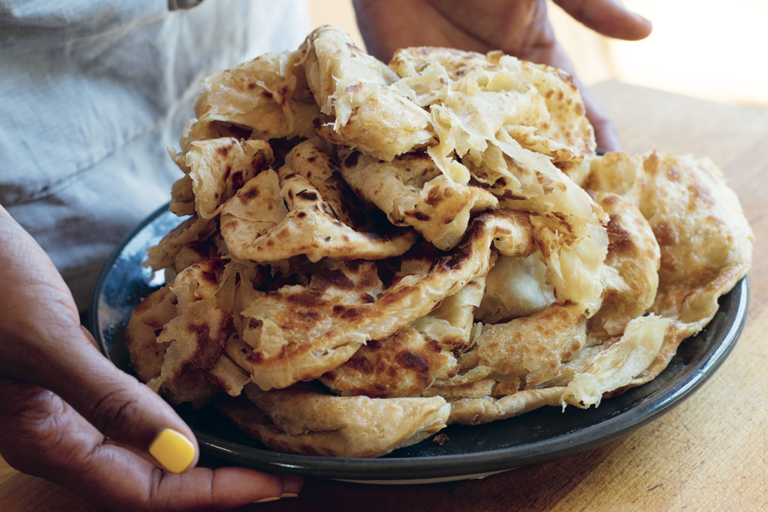
Marie Mitchell says: 'Roti found its way to the Caribbean via indentured Indian labourers, a large Indian diaspora, with the biggest communities in Trinidad and Tobago and Guyana, who introduced foods like curries, roti and chutneys to the region. The name ‘buss up shut’ comes from the way the roti is beaten with wooden spatulas, spoons and hands after cooking, breaking up the layers until it looks like a ‘bust-up shirt’. Making roti is my therapy – my hands work and my mind rests. For that, I’m very thankful to Joe, who, for a number of years, was my (business) partner-in-crime with Island Social Club – if it weren’t for him, I doubt roti would have become so integral to my cooking.'
Ingredients
Metric
Imperial
- 450g of bread flour, plus extra for dusting
- 1/2 tbsp of baking powder
- 1/2 tbsp of fine sea salt
- 1/2 tbsp of light brown sugar
- 300ml of water, hand-hot, or oat milk or whole milk
- 1/2 tbsp of sunflower oil
- 100mm of sunflower oil, and 100g melted ghee (have a bit extra, just in case), combined
Method
Place all the dry ingredients into a large mixing bowl and stir to combine. Make a well in the centre and pour in the water or milk. Using your fingers, gradually incorporate the dry ingredients into the liquid to form a wet dough
- 450g of bread flour, plus extra for dusting
- 1/2 tbsp of baking powder
- 1/2 tbsp of fine sea salt
- 1/2 tbsp of light brown sugar
- 300ml of water, hand-hot, or oat milk or whole milk
Turn out the dough on to a lightly floured work surface and knead it for about 10 minutes, to a soft, springy ball that you can press lightly and have it spring back. Grease the dough with oil, then place it in a clean bowl. Cover, and leave the dough to rest at room temperature for 30 minutes
Divide the dough into six equal balls. One by one, hold each ball in the palm of one hand and gently pinch the outer edge of the ball with your opposite hand, bringing it into the centre. Repeat all around the ball edge. Use a thumb to press into the centre to seal all the pinches together
Once you have sealed all the balls, oil them and rest them in your mixing bowl, covered with a tea towel, for another 30 minutes (you can place them on a baking tray, if you prefer). Once they have rested, use your hands to gently flatten each ball and rotate it to form a fat disc
- 1/2 tbsp of sunflower oil
A portion at a time, shape the roti. Using a rolling pin, roll each dough ball into a 15cm disc, repeatedly rolling and turning through 180 degrees for an even roll. Imagine the disc as a clock face. Slice the dough disc at 12 o’clock, making a vertical slit to the centre. Brush the disc generously with your oil and ghee mixture, all the way to the edge, then pick up the right-hand cut edge and, in thirds, fold over the first half of the clock face, in a clockwise direction (2 o’clock to 4 o’clock to 6 o’clock). Then, roll the dough from the folded edge around the rest of the imaginary clock face (clockwise to 12), so that you finish with a tight, layered cone
- 100mm of sunflower oil, and 100g melted ghee (have a bit extra, just in case), combined
Holding the cone in one hand, point downward, use your opposite thumb to push all the layers into the centre to seal the end of the cone. Return the cone to the work surface, sealed end downward, and press in the pointed end to seal there, too. Repeat for each ball of dough
Transfer the roti to the fridge and rest them for at least 4 hours, but ideally overnight, so you preserve those lovely layers. Alternatively place the cones in an airtight container (side by side, but never stacked on top of one another, which would deform their shape) and freeze them for up to 3 months. (Alternatively you can freeze them once they are rolled out, before cooking, and cook them from frozen.) Keep the remaining oil and ghee mixture for when you come to cook – you’ll need to warm it a little to loosen it again for brushing
When you’re ready to cook, gently flatten the dough balls into a round and roll them out using the same motion of one direction at a time, repeatedly rotating through 180 degrees to get a circular, flat roti, about 15cm in diameter and 4–5mm thick (don’t worry if it’s not perfect – my roti rarely are). You don’t want to roll too hard or too thin as you will then lose all the lovely layers
Warm a tawa or frying pan on a medium heat. When hot, brush the pan with your oil and ghee mixture and place your first roti on or in the pan. Oil the roti a little before flipping it over, you’ll want to make sure it is nicely coloured – no more than 30 seconds to 1 minute each side should be perfect. Then, beat each roti all over with your spatula until it starts to break up a little, before setting aside to keep warm while you repeat with the remaining dough. Once all the roti are cooked, serve them straightaway
Get in touch
Please sign in or register to send a comment to Great British Chefs.
You may also like
SITES

